I’m (not) a little teapot

A large sculpture of the Utah teapot, given a dark and light grey chequered pattern.
‘Smithfield Utah’ teapot created by Alan Butler, 2021, photographed by John Flanagan and made available under a CC 4.0 licence, via Wikipedia’s page on the Utah teapot.

My friends and I had just left the cinema after seeing Jurassic Park (in 1993, so a long time ago!) when one of the group pointed out that it was a shame the film didn’t have any dinosaurs in. We all argued that it was full of dinosaurs… until the penny dropped. Of course, obviously, the film couldn’t have contained any real dinosaurs, it was all done with animatronics* and (the relatively new at that time) CGI or computer-generated imagery.

The artist Rene Magritte had the same idea with his famous painting called ‘The treachery of images‘ but mostly known as ‘This is not a pipe’ (or ‘Ceci n’est pas une pipe’ in French). His creation represents a pipe but as Magritte said – “could you stuff my pipe? No, it’s just a representation, is it not? So if I had written on my picture “This is a pipe”, I’d have been lying!”

How do you represent something on a computer screen (that’s not actually real) but make it look real?

[*animatronics = models of creatures (puppets) with hidden motors and electronic controls that allow the creatures to move or be moved]

Let’s talk teapots

Computers now assist film and television show makers to add incredible scenes into their productions, that audiences usually can’t tell apart from what’s actually ‘real’ (recorded directly by the camera from live scenes). All these amazing graphics are created by numbers and algorithms inside a computer that encode the instructions for what the computer should display, describing the precise geometry of the item to create. A mathematical formula takes data points and creates what’s known as a series of ‘Bezier curves‘ from them, forming a fluid 3D shape on-screen.

In the 1970s Martin Newell, a computer graphics researcher studying at the University of Utah, was working on algorithms that could display 3D shapes on a screen. He’d already used these to render in 3D the five simple geometric shapes known as the Platonic solids** and he wanted to test his algorithms further with a slightly more complex (but not too much!) familiar object. Over a cup of tea his wife Sandra Newell suggested using their teapot – an easily recognisable object with curved surfaces, a hole formed by the handle and, depending on where you put the light, parts of it can be lit or in shadow.

Martin created on graph paper a representation of the co-ordinates of his teapot (you can see the original here). He then entered those co-ordinates into the computer and a 3D virtual teapot appeared on his screen. Importantly he shared his ‘Utah teapot’ co-ordinates with other researchers so that they could also use the information to test and refine their computer graphic systems.

[**the teapot is also jokingly referred to as the sixth Platonic solid and given the name ‘teapotahedron’]

Bet you’ve seen the Utah teapot before

Over time the teapot became a bit of an in-joke among computer graphic artists and versions of it have appeared in films and TV shows you might have seen. In a Hallowe’en episode of The Simpsons***, Homer Simpson (usually just a 2D drawing) is shown as a 3D character with a small Utah teapot in the background. In Toy Story Buzz Lightyear and Woody pour a cup of tea from a Utah teapot and a teapot template is included in many graphics software packages (sometimes to the surprise of graphic designers who might not know its history!)

[***”The Simpsons Halloween Special VI”, Series 7 Episode 6]

Here’s one I made earlier

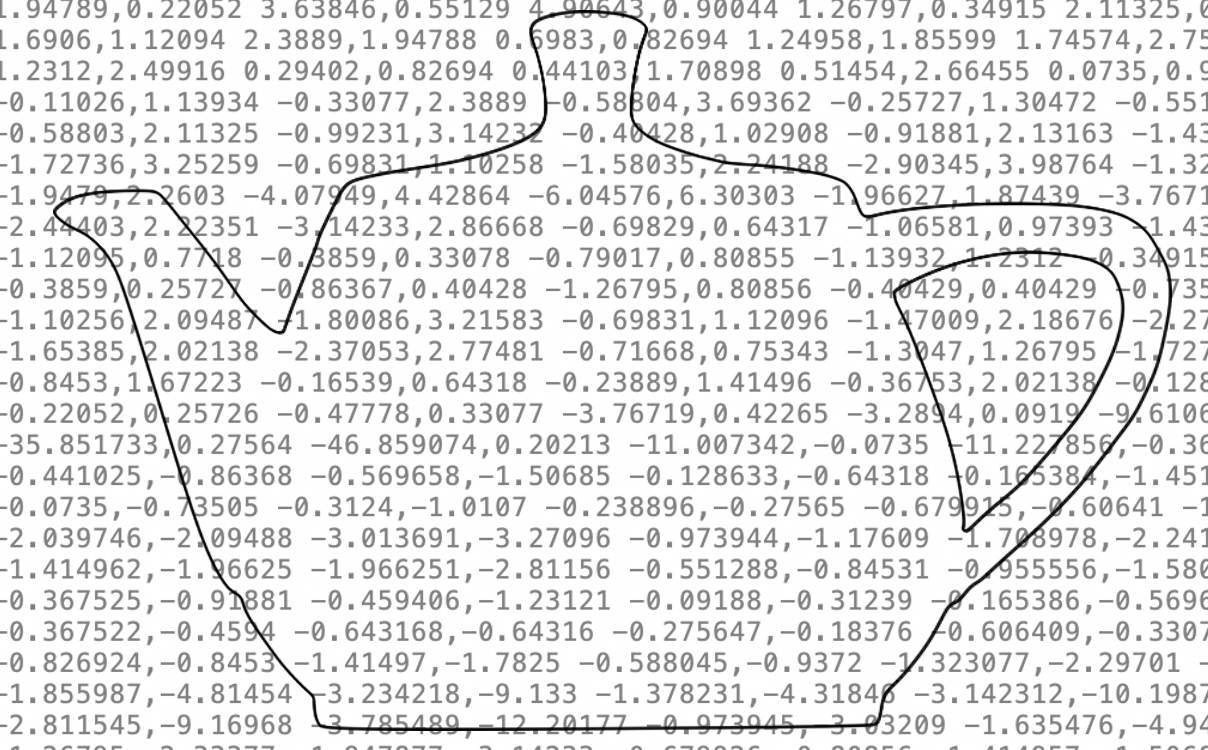
On the left is a tracing I made, of this photograph of a Utah teapot, using Inkscape’s pen tool (which lets me draw Bezier curves). Behind it in grey text is the ‘under the bonnet’ information about the co-ordinates. Those tell my computer screen about the position of the teapot on the page but will also let me resize (scale) the teapot to any size while always keeping the precise shape the same.

Create your own teapot, or other graphics

Why not have a go yourself, Inkscape is free to download (and there are lots of instructional videos on YouTube to show you how to use it). Find out more about Vector Graphics with our Coordinate conundrum puzzles and Vector dot-to-dot puzzles.

Do make yourself a nice cup of tea first though!

Further reading / watching

How Did A Teapot Revolutionise Computer Graphics Animation? (5 August 2024) Academyclass.com

‘Things You Might Not Know’ by Tom Scott on the Utah teapot

Jo Brodie, Queen Mary University of London


Share this post


Part of a series of ‘whimsical fun in computing’ to celebrate April Fool’s (all month long!).

Find out about some of the rather surprising things computer scientists have got up to when they're in a playful mood.

Subscribe to be notified whenever we publish a new post to the CS4FN blog.


This page is funded by EPSRC on research agreement EP/W033615/1.

QMUL CS4FN EPSRC logos

Marc Hannah and the graphics pipeline

Film and projectors
Image by Gerd Altmann from Pixabay

What do a Nintendo games console and the films Jurassic Park, Beauty and the Beast and Terminator II have in common? They all used Marc Hannah’s chips and linked programs for their amazing computer effects..It is important that we celebrate the work of Black Computer Scientists and Marc is one who deserves the plaudits as much as anyone as his work has had a massive effect on the leisure time of everyone who watches movies with special effects or plays video games – and that is just about all of us.

In the early 1980s, with six others, Marc founded Silicon Graphics, becoming its principal scientist. Silicon Graphics was a revolutionary company, pioneering fast computers capable of running the kind of graphics programs on special graphics chips that suddenly allowed the film industry to do amazing special effects. Those chips and linked programs were designed by Marc.

Now computers and games consoles have special graphics chips that do fast graphics processing as standard, but it is Marc and his fellow innovators at Silicon Graphics who originally made it happen.

It all started with his work with James Clark on a system called the Geometry Engine while they were at Stanford. Their idea was to create chips that do all the maths needed to do sophisticated manipulation of imagery. VLSI (Very Large scale Integration), whereby computers were getting smaller and fitting on a chip was revolutionising computer design. Suddenly a whole microprocessor could be put on a single chip because tens of thousands (now billions) of transistors could be put on a single slice of silicon. They pioneered the idea of using VLSI for creating 3-D computer imagery, rather than just general-purpose computers, and with Silicon Graphics they turned their ideas into an industrial reality that changed both film and games industries for ever.

Silicon Graphics was the first company to create a VLSI chip in this way, not to be a general-purpose computer, but just to manipulate 3-D computer images.

A simple 3D image in a computer might be implemented as the vertices (corners) of a series of polygons. To turn that into an image on a flat screen needs a series of mathematical manipulations of those points’ coordinates to find out where they end up in that flat image. What is in the image depends on the position of the viewer and where light is coming from, for example. If the object is solid you also need to work out what is in front, so seen, and what behind, so not. Each time the object, viewer or light source moves, the calculations need to be redone. It is done as a series of passes doing different geometric manipulations in what is called a geometry pipeline and it is these calculations they focussed on. They started by working out which computations had to be really fast: the ones in the inner most loops of the code that did this image processing, so was executed over and over again. This was the complex code that meant processing images took hours or days because it was doing lots of really complex calculation. Instead of trying to write faster code though, they instead created hardware, ie a VLSI chip, to do the job. Their geometry pipeline did the computation in a lightening fast way as it was avoiding all the overhead of executing programs and instead implementing the calculations that slowed things down directly in logic gates that did all that crucial maths very directly and so really quickly.

The result was that their graphic pipeline chips and programs that worked with them became the way that CGI (computer generated imagery) was done in films allowing realistic imagery, and were incorporated into games consoles too, allowing for ever more realistic looking games.

So if some amazing special effects make some monster appear totally realistic this Halloween, or you get lost in the world of a totally realistic computer game, thank Marc Hannah, as his graphics processing chips originally made it happen.

– Paul Curzon, Queen Mary University of London

More on …


Magazines …

Front cover of CS4FN issue 29 - Diversity in Computing

Subscribe to be notified whenever we publish a new post to the CS4FN blog.


This blog is funded through EPSRC grant EP/W033615/1.

Creating great game worlds

by Wateen Aliady, Queen Mary University of London

A minecraft world
Image by allinonemovie from Pixabay

Are you a PUBG or Fortnite addict? Maybe you enjoy playing Minecraft? Have you thought how these games are created? Could you create a game yourself? It is all done using something called a “Game Engine”.

Games and films are similar as they require creativity and effort to make. Every movie is created by a talented cinema director who oversees everything involved in creating the film. Game creators use a special set of tools instead that similarly allow them to make compelling video game worlds, stories, and characters. These tools are called game engines and they bring your creative ideas to life! They are now even used to help make films too. So, whether you’re playing a game or watching a movie, get ready to be amazed as game creators and movie directors, the masterminds behind these incredible works, deliver captivating experiences that will leave us speechless.

Imagine a group of talented people working together to create a great video game. Miracles happen when a team’s mission becomes one. Every member in the team has a certain role, and when they work together, amazing things can happen. A key member in the group is the graphics whiz. They make everything look stunning by creating pretty scenery and characters with lots of details. Then, we have the physics guru who makes sure objects move realistically, like how they would in real life. They make things fall, bounce, and hit each other accurately. For example, they ensure the soccer ball in the game behaves like a real soccer ball when you kick it. Next, the sound expert who adds all the sounds to the game. The game engine takes on all these roles, so the experience and skill of all those people is built into the game engine, so now one person driving it can use it to create a stunning detailed backdrop, with physics that just works, integrated sound and much more.

Game creators use game engines to make all kinds of games. They have been used to create popular games like Minecraft and Fortnite. When you play a game, you enter a completely different world. You can visit epic places with beautiful views and secrets to discover. You can go on big adventures, solve tricky problems, and be immersed in thrilling fights. Game engines allow game developers to make fun and engaging games that people of all ages enjoy playing by looking after all the detail, leaving the developer to focus on the overall experience.

Anyone can learn to use a game engine even powerful industry standard ones like Unity used to create Pokemon Go, Monument Valley and Call of Duty: Mobile. Game engines could help you to create your own novel and creative games. These amazing tools can help you in creating characters, scenes, and adding fun features like animation and music. You can turn your ideas into fun games that you and your friends can play together. You might create a new video game that becomes massively popular, and people love all around the world. All it takes is for you to have the motivation and be willing to put in the time to learn the skills of driving a game engine and to develop your creativity. Interested? Then get started. You can do anything you want in a game world, so use your imagination and let the game engine help you make amazing games!

More on …

Magazines …


EPSRC supports this blog through research grant EP/W033615/1. 

The last piece of the continental drift puzzle

by Paul Curzon, Queen Mary University of London

Image by Gerd Altmann from Pixabay 

A computer helped provide the final piece in the puzzle of how the continents formed and moved around. It gave a convincing demonstration that the Americas, Europe and Africa had once been one giant continent, Pangea, the pieces of which had drifted apart.

Plate tectonics is the science behind how the different continents are both moving apart and crashing together in different parts of the world driven by the motion of molten rock below the Earths crust. It created the continents and mountain ranges, is causing oceans to expand and to sink, and leads to earthquakes in places like California. The earth’s hard outer shell is made up of a series of plates that sit above hotter molten rock and those plates slowly move around (up to 10cm a year) as, for example, rock pushes up between the gaps and solidifies. or pushes down and down under an adjacent plate. The continents as we see them are sitting on top of these plates.

The idea of continental drift had existed in different forms since the early 19th century. The idea was partly driven by an observation that on maps, South America and Africa seemed almost like two jigsaw pieces that fit together. On its own an observation like this isn’t enough as it could just be a coincidence, not least because the fit is not exact. Good science needs to combine theory with observation, predictions that prove correct with data that provides the evidence, but also clear mechanisms that explain what is going on. All of this came together to show that continental drift and ultimately plate tectonics describe what is really going on.

Very many people gathered the evidence, made the predictions and built the theories over many decades. For example, different people came up with a variety of models of what was happening but in the 19th and early 20th centuries there just wasn’t enough data available to test them. One theory was that the continents themselves were floating through the layer of rock below a bit like ice bergs floating in the ocean. Eventually evidence was gathered and this and other suggestions for how continents were moving did not stand up to the data collected. It wasn’t until the 1960s that the full story was tied down. The main reason that it took so long was that it needed new developments in both science and technology, most notably understanding of radioactivity, magnetism and not least ways to survey the ocean beds as developed during World War II to hunt for submarines. Science is a team game, always building on the advances of others, despite the way individuals are singled out.

By the early 1960s there was lots of strong evidence, but sometimes it is not just a mass of evidence that is needed to persuade scientists en-masse to agree a theory is correct, but compelling evidence that is hard to ignore. It turned out that was ultimately provided by a computer program.

Geophysicist, Edward Bullard, and his team in Cambridge were responsible for this last step. He had previously filled in early pieces of the puzzle working at the National Physical Laboratory on how the magnetism in the Earth’s core worked like a dynamo. He used their computer (one of the earliest) to do simulations to demonstrate this. This understanding led to studies of the magnetism in rock. This showed there were stripes where the magnetism in rock was in opposite directions. This was a result of rock solidifying either in different places or at different times and freezing the magnetic direction of the Earth at that time and place. Mapping of this “fossil” magnetism could be used to explore the ideas of continental drift. One such prediction suggested the patterns should be identical on either side of undersea ridges where new rock was being formed and pushing the plates apart. When checked they were exactly symmetrical as predicted.

	Jacques Kornprobst (redesigned after Bullard, E., Everett, J.E. and Smith, A.G., 1965. The fit of the continents around the Atlantic. Phil. Trans. Royal Soc., A 258, 1088, 41-51)

Image reconstruction of Bullard’s map by Jacques Kornprobst
from Wikipedia  CC BY-SA 4.0

In the 1960s, Bullard organised a meeting at the Royal Society to review all the evidence about continental drift. There was plenty of evidence to see that continental drift was fact. However, he unveiled a special map at the meeting showing how the continents on either side of the Atlantic really did fit together. It turned out to be the clincher.

The early suggestion that Africa and South America fit together has a flaw in that they are similar shapes, but do not fit exactly. With the advent of undersea mapping it was realised the coastline as shown on maps is not the right thing to be looking at. Those shapes depend on the current level of the sea which rises and falls. As it does so the apparent shape of the continents changes. In terms of geophysics, the real edge of the continents is much lower. That is where the continental shelf ends and the sea floor plummets. Bullard therefore based the shape of the continents on a line about a kilometre below sea level which was now known accurately because of that undersea mapping.

Maps like this had been created before but they hadn’t been quite as convincing. After all a human just drawing shapes as matching because they thought they did could introduce bias. More objective evidence was needed.

We see the Earth as flat on maps, but it is of course a sphere, and maps distort shapes to make things fit on the flat surface. What matters for continents is whether the shapes fit when placed and then moved around on the surface of a sphere, not on a flat piece of paper. This was done using some 18th century maths by Leonhard Euler. At school we learn Euclidean Geometry – the geometry of lines and shapes on a flat surface. The maths is different on a sphere though leading to what is called Spherical Geometry. For example, on a flat surface a straight line disappears in both directions to infinity. On a sphere a straight line disappearing in one direction can of course meet itself in the other. Similarly, we are taught that the angles of a triangle on a flat surface add up to 180 degrees, but the angles of a triangle drawn on a sphere add up to more than 180 degrees… Euler, usefully for Bullard’s team, had worked out theorems for how to move shapes around on a sphere.

This maths of spherical geometry and specifically Euler’s theorems form the basis of an algorithm that the team coded as a program. The program then created a plot following the maths. It showed the continents moved together in a picture (see above). As it was computer created, based on solid maths, it had a much greater claim to be objective, but on top of that it did also just look so convincing. The shapes of the continents based on that submerged continental line fit near perfectly all the way from the tip of South America to the northern-most point of North America. The plot became known as the ‘Bullard Fit’ and went down in history as the evidence that sealed the case.

The story of continental drift is an early example of how computers have helped change the way science is done. Computer models and simulations can provide more objective ways to test ideas, and computers can also visualise data in ways that help see patterns and stories emerge in ways that are both easy to understand and very convincing. Now computer modelling is a standard approach used to test theories. Back then the use of computers was much more novel, but science provided a key early use. Bullard and his team deserve credit not just for helping seal the idea of continental drift as fact, but also providing a new piece to the puzzle of how to use computers to do convincing science.

More on …

  • Read the book: Science: a history by John Gribbin for one of the best books on the full history of Science including plate techtonics.

Related Magazines …


EPSRC supports this blog through research grant EP/W033615/1. 

Lego computer science: compression algorithms

Continuing a series of blogs on what to do with all that lego scattered over the floor: learn some computer science…

A giraffe image made of coloured squares
A giraffe as a pixel image.
Colour look-up table
Black 0
Blue 1
Yellow 2
Green 3
Brown 4
Image by Paul Curzon

We saw in the last post how images are stored as pixels – the equivalent of square or round lego blocks of different colours laid out in a grid like a mosaic. By giving each colour a number and drawing out a gird of numbers we give ourself a map to recreate the picture from. Turning that grid of numbers into a list (and knowing the size of the rectangle that is the image) we can store the image as a file of numbers, and send it to someone else to recreate.

Of course, we didn’t really need that grid of numbers at all as it is the list we really need. A different (possibly quicker) way to create the list of numbers is work through the picture a brick at a time, row by row and find a brick of the same colour. Then make a long line of those bricks matching the ones in the lego image, keeping them in the same order as in the image. That long line of bricks is a different representation of the image as a list instead of as a grid. As long as we keep the bricks in order we can regenerate the image. By writing down the number of the colour of each brick we can turn the list of bricks into another representation – the list of numbers. Again the original lego image can be recreated from the numbers.

7 blue squares (1) a green square (3) 6 blue squares (1) 2 green suares (3) ...
The image as a list of bricks and numbers
Colour look-up table: Black 0: Blue 1: Yellow 2: Green 3: Brown 4
Image by Paul Curzon

The trouble with this is for any decent size image it is a long list of numbers – made very obvious by the very long line of lego bricks now covering your living room floor. There is an easy thing to do to make them take less space. Often you will see that there is a run of the same coloured lego bricks in the line. So when putting them out, stack adjacent bricks of the same colour together in a pile, only starting a new pile if the bricks change colour. If eventually we get to more bricks of the original colour, they start their own new pile. This allows the line of bricks to take up far less space on the floor. (We have essentially compressed our image – made it take less storage space, at least here less floor space).

A histogram of the squares
7x1 1 x3 6x1 ...

Image by Paul Curzon

Now when we create the list of numbers (so we can share the image, or pack all the lego away but still be able to recreate the image), we count how many bricks are in each pile. We can then write out a list to represent the numbers something like 7 blue, 1 green, … Of course we can replace the colours by numbers that represent them too using our key that gives a number to each colour (as above).

If we are using 1 to mean blue and the line of bricks starts with a pile of seven black bricks then write down a pair of numbers 7 1 to mean “a pile of seven blue bricks”. If this is followed by 1 green bricks with 3 being used for green then we next write down 1 3, to mean a pile of 1 green bricks and so on. As long as there are lots of runs of bricks (pixels) of the same colour then this will use far less numbers to store than the original:

7 1 1 3 6 1 2 3 1 1 1 2 3 1 2 3 2 2 3 1 2 3 …

We have compressed our image file and it will now be much quicker to send to a friend. The picture can still be rebuilt though as we have not lost any information at all in doing this (it is called a lossless data compression algorithm). The actual algorithm we have been following is called run-length encoding.

Of course, for some images, it may take more not less numbers if the picture changes colour nearly every brick (as in the middle of our giraffe picture). However, as long as there are large patches of similar colours then it will do better.

There are always tweaks you can do to algorithms that may improve the algorithm in some circumstances. For example in the above we jumped back to the start of the row when we got to the end. An alternative would be to snake down the image, working along the adjacent rows in opposite directions. That could improve run-length encoding for some images because patches of colour are likely the same as the row below, so this may allow us to continue some runs. Perhaps you can come up with other ways to make a better image compression algorithm

Run-length encoding is a very simple compression algorithm but it shows how the same information can be stored using a different representation in a way that takes up less space (so can be shared more quickly) – and that is what compression is all about. Other more complex compression algorithms use this algorithm as one element of the full algorithm.

Activities

Make this picture in lego (or colouring in on squared paper or in a spreadsheet if you don’t have the lego). Then convert it to a representation consisting of a line of piles of bricks and then create the compressed numbered list.

A pixelated pictures of a camel by a tree in sand dunes
An image of a camel to compress: Colour look-up table: Black 0: Blue 1: Yellow 2: Green 3: Brown 4
Image by Paul Curzon

Make your own lego images, encode and compress them and send the list of numbers to a friend to recreate.


More on …

This post was funded by UKRI, through grant EP/K040251/2 held by Professor Ursula Martin, and forms part of a broader project on the development and impact of computing.

Lego Computer Science

Part of a series featuring featuring pixel puzzles,
compression algorithms, number representation,
gray code, binary, logic and computation.

QMUL CS4FN EPSrC logos

Lego computer science: pixel pictures

by Paul Curzon, Queen Mary University of London

It is now after Christmas. You are stuffed full of turkey, and the floor is covered with lego. It must be time to get back to having some computer science fun, but could the lego help? As we will see you can explore digital images, cryptography, steganography, data compression, models of computing, machine learning and more with lego (and all without getting an expensive robot set which is the more obvious way to learn computer science with lego though you do need lots of lego). Actually you could also do it all with other things that were in your stocking like a bead necklace making set and probably with all that chocolate, too.

First we are going to look at understanding digital images using lego (or beads or …)

Raster images

Digital images come in two types: raster (or bitmap) images and vector images. They are different kinds of image representation. Lego is good for experimenting with the former through pixel puzzles. The idea is to make mosaic-like pictures out of a grid of small coloured lego. Lego have recently introduced a whole line of sets called Lego Art should you want to buy rather amazing versions of this idea, and you can buy an “Art Project” set that gives you all the bits you need to make your own raster images. You can (in theory at least) make it from bits and pieces of normal lego too. You do need quite a lot though.

Raster images are the basic kind of digital image as used by digital cameras. A digital image is split into a regular grid of small squares, called pixels. Each pixel is a different colour.

To do it yourself with normal lego you need, for starters, to collect lots of the small circle or square pieces of different colours. You then need a base to put them on. Either use a flat plate piece if you have one or make a square base of lego pieces that is 16 by 16. Then, filling the base completely with coloured pieces to make a mosaic-like picture. That is all a digital image really is at heart. Each piece of lego is a pixel. Computer images just have very tiny pieces, so tiny that they all merge together.

Here is one of our designs of a ladybird.

A ladybird image made of pixels
A pixel image of a ladybird
Image by Paul Curzon

The more small squares you have to make the picture, the higher the resolution of the image With only 16 x 16 pixels we have a low resolution image. If you only have enough lego for an 8×8 picture then you have lower resolution images. If you are lucky enough to have a vast supply of lego then you will be able to make higher resolution, so more accurate looking images.

Lego-by-numbers

Computers do not actually store colours (or lego for that matter). Everything is just numbers. So the image is stored in the computer as a grid of numbers. It is only when the image is displayed it is converted to actual colours. How does that work. Well you first of all need a key that maps colours to numbers: 0 for black, 1 for red and so on. The number of colours you have is called the colour depth – the more numbers and linked colours in your key, the higher the colour depth. So the more different coloured lego pieces you were able to collect the larger your colour depth can be. Then you write the numbers out on squared paper with each number corresponding to the colour at that point in your picture. Below is a version for our ladybird…

A grid of numbers representing colours
The number version of our ladybird picture
Image by Paul Curzon

Now if you know this is a 16×16 picture then you can write it out (so store it) as just a list of numbers, listed one row after another instead: [5,5,4,4,…5,5,0,4,…4,4,7,2] rather than bothering with squared paper. To be really clear you could even make the first two numbers the size of the grid: [16,16,5,5,4,4,…5,5,0,4,…4,4,7,2]

That along with the key is enough to recreate the picture which has to be either agreed in advance or sent as part of the list of numbers.

You can store that list of numbers and then rebuild the picture anytime you wish. That is all computers are doing when they store images where the file storing the numbers is called an image file.

A computer display (or camera display or digital tv for that matter) is just doing the equivalent of building a lego picture from the list of numbers every time it displays an image, or changes an old one for something new. Computers are very fast at doing this and the speed they do so is called the frame rate – how many new pictures or frames they can show every second. If a computer has a frame rate of 50 frames per second, then it as though it can do the equivalent of make a new lego image from scratch 50 times every second! Of course it is a bit easier for a computer as it is just sending instructions to a display to change the colour shown in each pixels position rather than actually putting coloured lego bricks in place.

Sharing Images

Better still you can give that list of numbers to a friend and they will be able to rebuild the picture from their own lego (assuming they have enough lego of the right colours of course). Having shared your list of numbers, you have just done the equivalent of sending an image over the internet from one computer to another. That is all that is happening when images are shared, one computer sends the list of numbers to another computer, allowing it to recreate a copy of the original. You of course still have your original, so have not given up any lego.

So lego can help you understand simple raster computer images, but there is lots more you can learn about computer science with simple lego bricks as we will see…


More on …


This post was funded by UKRI, through grant EP/K040251/2 held by Professor Ursula Martin, and forms part of a broader project on the development and impact of computing.

Lego Computer Science

Part of a series featuring featuring pixel puzzles,
compression algorithms, number representation,
gray code, binary and computation.

QMUL CS4FN EPSrC logos